

When the stakes are high and the competition is fierce, keeping cool is key. In digital entertainment, overheating can ruin your game. So, how do you keep your setup cool?
Every second matters, whether you’re in a virtual battle or exploring new worlds. A smooth experience can make all the difference. Let’s explore the latest innovations to keep your tech running smoothly.
There are many options out there, from thermal paste to cooling units. We’re here to help you navigate these choices. With the right tools and knowledge, your system will perform like a champion, even under pressure.
Cooling Fundamentals: Heat Generation, Thermal Throttling, and Performance Impact
In gaming, heat is a hidden enemy that can hurt your system’s performance. Every action in games makes your computer hotter. The more powerful your computer parts, the more heat they produce.
Modern CPUs and GPUs have a safety feature called thermal throttling. When it gets too hot, they slow down to avoid damage. This slowdown can really affect how well you play games.
Lowering the temperature by just 10°C can make a big difference. It can turn a stuttery game into a smooth one. Managing heat is key for any serious gamer.
It’s interesting how many gamers don’t know about thermal velocity boost algorithms. These are special features in some chips that help them run cooler and faster. For a gaming PC cooling plan in 2025, cooling is not just a necessity but a way to improve performance.
Cooler silicon means better performance. This is a basic rule that affects your gaming experience. To show this, let’s look at how temperature affects CPU performance:
| Temperature (°C) | Performance Impact | Cooling Solution |
|---|---|---|
| 70 | Optimal Performance | Air Cooling |
| 80 | Minor Throttling | AIO Liquid Cooling |
| 90 | Significant Throttling | Custom Loop Cooling |
| 100+ | Severe Performance Loss | Immediate Shutdown |
In summary, knowing about heat and thermal throttling is key for a good CPU cooling plan. By understanding cooling science, you can make your gaming rig perform its best.
Air Cooling Champions: Noctua NH-D15, be quiet! Dark Rock Pro 4, and Tower Cooler Comparison
The Noctua NH-D15 is like the LeBron James of air coolers. It’s a giant that keeps getting better with age. It’s so good, you might wonder if you need liquid cooling at all. Its design has become a symbol in the PC world.
The be quiet! Dark Rock Pro 4 is like a Bond villain. It’s sleek, quiet, and powerful. It can handle up to 250W TDP without making a sound. It’s like a silent giant!
The Thermalright Peerless Assassin 120 is a budget option that challenges the big names. It’s priced at around $40 and performs almost as well as the top coolers. It makes you think: is it better to spend more or less on cooling?
When comparing coolers, I look at more than just how much heat they can handle. I also check how easy they are to install and if they fit with other parts. You don’t want to find out your RAM won’t fit after you’ve bought the cooler!
Here’s a quick comparison to help you choose:
| Cooler Model | Max TDP (W) | Noise Level (dBA) | Price ($) |
|---|---|---|---|
| Noctua NH-D15 | 250 | 24.6 | 99 |
| be quiet! Dark Rock Pro 4 | 250 | 24.3 | 90 |
| Thermalright Peerless Assassin 120 | 200 | 30 | 40 |
Choosing the right cooler for your gaming PC cooling isn’t just about finding the best one. It’s about deciding which failure mode you can live with. Air coolers fail in a way that’s less dramatic than liquid coolers. They keep cooling even if a fan stops. But, liquid coolers can fail in a way that’s much worse.
AIO Liquid Cooling: 240mm vs 280mm vs 360mm Performance and Compatibility
The debate between 240mm, 280mm, and 360mm AIO coolers is like finding the perfect fit. Each size has its own advantages and disadvantages. It’s important to choose the right one for the best performance.
A 240mm radiator is a popular choice. It can handle around 280-300W, perfect for moderate overclocking and gaming. But, if you’re pushing your CPU hard, a 280mm cooler might be better. It can handle 320-350W, giving you extra cooling without spending too much.
The 360mm AIO cooler is the top choice for ultimate cooling. It can handle over 380W, ideal for demanding setups. But, it might not fit in all cases, causing compatibility issues in compact builds.
| Size | Thermal Capacity (W) | Noise Level | Compatibility |
|---|---|---|---|
| 240mm | 280-300 | Moderate | High |
| 280mm | 320-350 | Low | Moderate |
| 360mm | 380+ | High | Low |
The 280mm AIO cooler is often the best choice. It balances cooling efficiency with quiet operation. Its larger fans move more air at lower RPMs, making it quieter than smaller fans.
But, finding the right fit can be hard. A case like the Lian Li O11 Dynamic might look great with a 360mm radiator. Yet, if your motherboard’s VRM heatsink sticks out, you might struggle. Always double-check your measurements before buying, as some radiators are thicker than others.
In summary, a 280mm AIO cooler is usually the best choice for gaming in 2025. It offers a good balance of cooling, noise, and ease of installation. For more information on the best AIO coolers, check out this comprehensive guide.
Custom Loop Cooling: Component Selection, Performance Benefits, and Maintenance Requirements
Getting into custom loop cooling is like making a fine wine. It needs patience, precision, and a bit of flair. It starts with cooling your CPU but can turn into a big hobby. You might find yourself looking up pumps and radiators late at night, wondering if it’s worth it.
Let’s talk about the parts you need. You’ll need a pump, like a D5 or DDC. Then, there’s a reservoir, radiators, tubing, and fittings. Remember, use compression fittings, not barb fittings. And pick a coolant that won’t mess up your loop.
Now, let’s look at the benefits. A custom loop might only cool your CPU by 5-8°C. But for your GPU, it’s a different story. You could see a 15-20°C drop in temperature compared to air coolers. That’s a big difference, making games more enjoyable.
But, there’s a catch. Maintenance is key. You’ll need to drain and flush your loop every 6-12 months. You’ll also have to check O-rings and avoid mixing metals. If you enjoy detailed work, it’s great. But if you just want to play games, it might not be worth it.
GPU Cooling Solutions: Aftermarket Coolers, Undervolting, and Thermal Pad Upgrades
GPU cooling is key to keeping gaming rigs running smoothly. Stock coolers from brands like ASUS, MSI, and Gigabyte vary a lot. Some work great, while others seem like they didn’t pass a thermal test.
Aftermarket coolers, like the Raijintek Morpheus series or Arctic’s Accelero line, can make a big difference. They might void your warranty and require handling bare PCBs carefully. But, they often beat the stock coolers by a lot.
Undervolting is a powerful cooling technique. It lowers voltage while keeping clock speeds the same. I’ve seen RTX 4090 cards cool down 8-12°C without losing performance. Most modern GPUs have extra voltage headroom that can be used for cooling.
Thermal pad upgrades are also important. Factory pads often don’t work well. Using high-performance pads from Thermal Grizzly or Fujipoly can cool down VRAM and VRM components by 15-20°C. This is key, as these components can get very hot under load.
| Cooling Method | Temperature Drop (°C) | Performance Impact | Warranty Consideration |
|---|---|---|---|
| Stock Cooler | Varies | Minimal | None |
| Aftermarket Cooler | 10-30 | None | Voids Warranty |
| Undervolting | 8-12 | None | None |
| Thermal Pad Upgrade | 15-20 | None | None |
GPU cooling might not be glamorous, but it’s where you can make big thermal gains. For more tips, check out how to manage NVIDIA H200 thermals and why cooling is important in gaming.
Case Airflow Optimization: Fan Curves, Intake vs Exhaust Configuration, and Positive Pressure
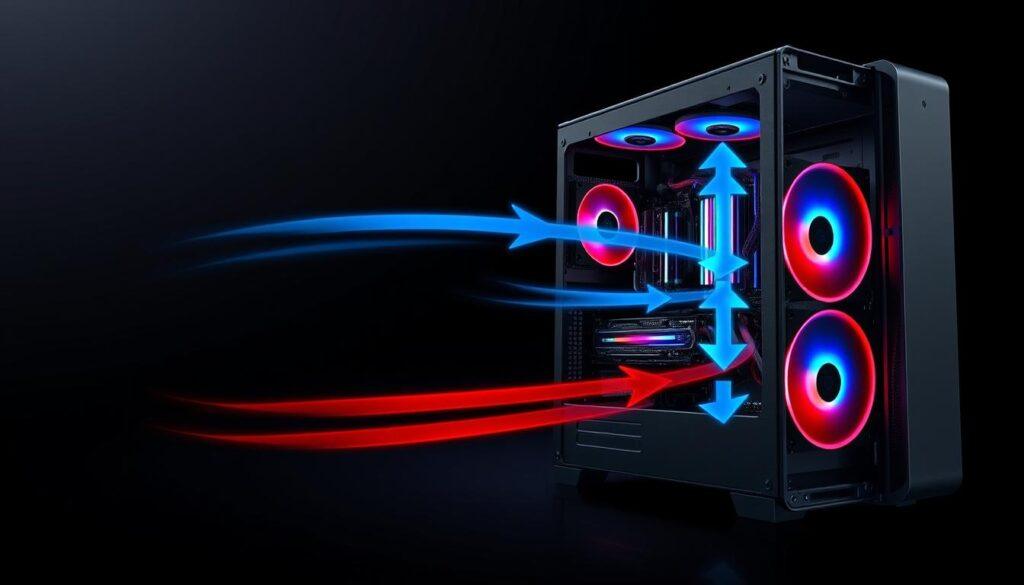
When it comes to cooling your gaming rig, airflow is key. Even the best CPU cooler won’t help if your case traps heat. Let’s explore how to optimize airflow, making every fan and vent count.
Fan curves are often overlooked. Most BIOS settings start fans at 40% until the CPU hits 75°C. Then, they blast up, sounding like a jet engine. Instead, create a custom curve that starts at 30% at 40°C and reaches 70% at 70°C. This keeps your system cool without the noise.
Next, we’ll look at intake versus exhaust fans. Intake fans should be at the front and bottom, while exhaust fans are at the rear and top. The right ratio is important. Three intake fans and two exhaust fans create positive pressure. This pushes air out, reducing dust.
On the other hand, negative pressure (more exhaust than intake) might cool better in some cases. But it makes your case a dust magnet. For the best cooling in 2025, start with three 120mm or two 140mm front intakes, one rear exhaust, and one top-rear exhaust if you like. Use incense to see airflow and leave your room smelling nice.
Thermal Interface Materials: Thermal Paste Application, Liquid Metal Considerations, and Longevity
Thermal interface materials are like the secret sauce for keeping your CPU cool. They act as a thin layer between your CPU and cooler, making sure heat is transferred well. The debate is on how to apply them—dot, X-pattern, or five-dot method? But, for most modern CPUs, the difference is small, about 1-2°C.
The quality of the thermal paste and how tight it’s applied matter more. Thermal Grizzly Kryonaut is the top choice, with a thermal conductivity of 12.5 W/mK. Noctua NT-H2 is close, with better long-term stability. For a big drop in temperature, try Thermal Grizzly Conductonaut, but be careful.
Liquid metal, like Thermal Grizzly Conductonaut, can lower temperatures by 5-10°C. But, it can cause problems like corrosion and short circuits. It also needs to be reapplied every 12-18 months.
Don’t think regular pastes are better. Most good TIMs last 3-5 years before they start to lose their effectiveness. If your CPU cooling isn’t working as well, a new thermal paste might be the answer. It’s a cheap way to boost your computer’s performance.
Noise Optimization: Silent Gaming Builds, Fan Speed Curves, and Acoustic Performance
Silence in gaming is more than a luxury; it’s a strategic advantage. The pursuit of a whisper-quiet rig often reveals a hidden truth: noise optimization is a thermal management challenge in disguise. Each decibel of fan noise represents thermal energy being moved. So, reducing thermal load or improving dissipation efficiency leads to a naturally quieter experience.
When it comes to fan selection, acoustics meet engineering. For instance, Noctua’s NF-A12x25 uses a Sterrox liquid-crystal polymer impeller. This ensures that turbulence noise drops below human perception at moderate RPMs. be quiet!’s Silent Wings 4 also features a fluid-dynamic bearing and rubberized mounting. These features effectively decouple vibrations from the case frame. But, even the finest fans can’t compensate for poorly configured fan speed curves.
I recommend tuning fan curves to keep speeds below 800 RPM during everyday use. This makes them effectively inaudible. Under gaming loads, capping speeds at 1200 RPM allows most quality 140mm fans to produce less than 25 dBA. The GPU typically emerges as the loudest component in any gaming setup. Coil whine can be a frustrating wildcard that no amount of fan tuning can resolve.
For those truly committed to silent thermal management, consider deshrouding your GPU and directly mounting case fans to the heatsink. This mod requires zip ties and a bit of courage. But it can significantly reduce GPU noise by 6-10 dBA. Achieving the holy grail of silent gaming demands a holistic approach. Every component choice—from the power supply, like the Seasonic Prime Fanless TX-700, to the case panel material—contributes to the overall acoustic signature.
| Fan Model | Max RPM | Noise Level (dBA) | Type |
|---|---|---|---|
| Noctua NF-A12x25 | 2000 | 22.6 | PWM |
| be quiet! Silent Wings 4 | 1600 | 26.8 | PWM |
| Cooler Master MasterFan MF120L | 2000 | 30.0 | DC |
Ultimately, achieving a silent gaming build is a meticulous endeavor. It requires careful consideration of each component’s contribution to noise and thermal management. For more insights on optimizing your setup, check out this resource.
Extreme Cooling: LN2, Phase Change, and Exotic Cooling for Overclocking
Extreme cooling is key for serious overclocking. In the world of performance tuning, liquid nitrogen (LN2) overclocking is the most dramatic. Imagine copper pots filled with -196°C liquid and motherboards covered in Vaseline to avoid condensation.
Professionals like Der8auer use LN2 to cool a Threadripper 7995WX, aiming for Cinebench world records. This is both absurd and fascinating, showing why we explore the limits of what’s possible.
Phase-change cooling adds a practical side to extreme cooling. It uses compressor-based refrigeration, like your kitchen freezer, to cool below freezing. The LD Cooling PC-V10 can keep a CPU at -50°C forever. But, it uses a lot of power, around 200-300W, and needs careful condensation management.
Exotic cooling solutions also include Peltier (thermoelectric) systems, thanks to Cooler Master’s innovative designs. The REDMAGIC VC Cooler 6 Pro, a mobile phone cooler, shows how extreme cooling has evolved. It uses vapor chamber liquid cooling with customizable RGB.
This shows that the search for thermal headroom goes beyond just desktops. Extreme cooling is the ultimate “moar cooling” philosophy—impractical, expensive, and amazing.
Temperature Monitoring: Software Tools, Hardware Sensors, and Thermal Management
Monitoring your temperatures is like having a compass in a storm; without it, you’re just lost. In the world of gaming, thermal management is not just a luxury—it’s a necessity. Ignoring it is akin to flying blind through a thunderstorm. Thankfully, the software landscape has matured beautifully, providing a wide range of tools to keep you informed.
One standout is HWiNFO64, the gold standard for sensor granularity. This tool exposes everything from CPU package temperature to per-core readings, GPU hotspot, VRAM junction temps, and even VRM thermal data that most utilities overlook. If you want to dive deep into your system’s thermal performance, this is your go-to.
Another invaluable tool is MSI Afterburner, perfect for real-time gaming thermal management. I configure mine to display CPU/GPU temperatures, clock speeds, and frame times. This heads-up display reveals the thermal-performance relationships in real time, allowing for quick adjustments during gameplay.
But let’s not forget about hardware sensors. Not all temperature readings are created equal. For instance, CPU “package” temperature is a weighted average that can mask hotspot spikes. AMD’s Tctl/Tdie and Intel’s DTS readings use different calibration methodologies, making direct cross-platform comparisons a bit tricky.
The GPU hotspot temperature is what I watch most closely. It’s typically 10-15°C above the edge temperature and represents the hottest point on the die. If your hotspot hits 105°C on an RTX 4090, you’re thermally throttling—even if the edge temperature reads a comfortable 75°C.
To further enhance your thermal management strategy, consider using Fan Control by Rem0o. This software has revolutionized how I approach cooling curves. It allows for mixed fan curves that reference multiple temperature sources simultaneously. Imagine tying case fan speeds to the maximum of CPU and GPU temperatures. That’s the kind of intelligent thermal management that separates a well-tuned build from one that’s merely adequately cooled.
| Software Tool | Key Features | Best For |
|---|---|---|
| HWiNFO64 | Granular sensor data, detailed thermal readings | In-depth analysis |
| MSI Afterburner | Real-time monitoring, on-screen display | Gaming performance tracking |
| Fan Control | Mixed fan curves, multiple sensor references | Dynamic cooling adjustments |
Installation Complexity: Difficulty Levels, Tool Requirements, and Professional Installation
Setting up your cooling solution can be easy or very hard. The difficulty level is often not mentioned, leaving many confused. I’ve been there, and it’s not fun. Knowing the difficulty can make your build experience better or worse.
Air coolers like the Noctua NH-D15 are easy to install. You just need a screwdriver, some thermal paste, and patience. Modern systems make it easy to mount even big coolers without trouble.
AIO coolers add more complexity. You have to be careful with radiator screws to avoid damage. You also need to plan how to route the pump headers and power them up.
Custom loops are the most complex. You’ll need a heat gun, a leak tester, and many Allen keys. Plus, you have to be ready for a possible leak during the pressure test.
Professional installation can cost a lot. Services like Micro Center or Maingear charge $150 to $300 for AIOs and over $500 for custom loops. It’s worth it if you don’t want to spend hours fixing problems.
Tools needed vary with your project size. A basic build needs just a screwdriver and zip tie cutters. But custom loops require a full toolkit. Knowing what tools you need is important for a successful build.
Maintenance Schedules: Cleaning Frequencies, Component Replacement, and Longevity Tips
Maintenance is key to keeping your PC running smoothly. It’s like brushing your teeth every day. If you ignore it, dust can harm your system. Filters and fans get clogged, reducing airflow by 10-15% in just three months.
Cleaning filters monthly and doing a deep clean every six months is a good plan. Use compressed air, isopropyl alcohol, and microfiber cloths for this.
AIO coolers have their own issues. Coolant can evaporate, causing air bubbles and a gurgling sound. Because they’re sealed, you’ll need to replace them eventually. This makes air cooling a more reliable choice.
Custom loops need extra care. Drain and flush them every 6-12 months. Check O-rings and seals, and replace the coolant often. Avoid using opaque coolants as they can clog faster. Also, watch out for biological growth and use a biocide if needed.
Thermal paste is another important factor. Replacing it every 3-5 years can improve thermal performance. For GPUs, consider repasting every 2-3 years, even more often for high-wattage cards. The factory paste wears out quickly, thanks to direct-die mounting.
Lastly, keeping your room cool is a secret to longevity. Aim for a temperature below 25°C (77°F). Sometimes, the best thermal management is a simple air conditioner.